Sunday, August 26, 2012

Don't discard those sprinkles...DIY Sprinkles Canister

One day, when I was making Olympics Cookies, I was presented with a dilemma.  You see, I had all of these sprinkles left from shaking them off the cookies. Usually, when I use sprinkles, I use one color. That way, I can easily put the excess back into the container they originally came in. This time, I mixed all the colors up. Still, being the penny-saver that I am, I wanted to find a way to use them. Then, I had an idea.


I had recently ran out of Meringue Powder. The canister looked like something I might be able to use for something else at a later date. I had tried to use it to store cupcake liners, but it was just a bit too small for that. Then, I thought about storing pastry bags, but it was too short. I was beginning to think that I might not be able to use this canister after-all. Then the whole sprinkles ordeal came about. This canister would be perfect for that.

So, I got out my Washi Tape and got to work.


First, you'll need to paint the canister. I used basic craft paint, but you can use spray paint as well. The craft paint took me three coats. I probably could have gotten away with two, but I wanted to make sure none of the writing would show through.


Next, you'll need to measure the canister. You will need to know how many strips of Washi Tape that you will need, and then you will need to measure how long the Washi Tape needs to be. This is simple. Just attach the tape to the canister, then peel it off. With my canister, I needed about 8 inches of Washi Tape. To print on the Washi Tape, follow these steps:

  1. Print your label onto a sheet of paper. I used size 48 Lucida Handwriting font. 
  2. Attach your Washi Tape to the paper, over the font. 
  3. Place the paper back into the printer, and print again.
Make sure you let the printed Washi Tape dry for at least 20 minutes. It may take longer.


While you are letting the printed Washi Tape dry, begin attaching the other Washi pieces to your canister. Try to maintain a designated seam, meaning make sure the seams match up. Also, try to line your Washi pieces up close together, so they look seamless. When your printed pieces are dry, attach those as well.


Your finished product should look similar to the picture above. Now, you have a cute place to store your sprinkles. You can't even tell that it used to be a canister for Meringue Powder.


Doesn't that look much better?


Miss Information


Come Party with Me

Print Friendly and PDF

Monday, August 20, 2012

PB & Snickers

So, for some reason, I've been on a Snickers kick lately. I think I saw some wonderful Snickers brownies somewhere, and they made me crave Snickers. I finally broke down and made some Snickers treats.


Peanut Butter goes great with the original Snickers. I guess that's why the Snickers company started making Snickers Peanut Butter Squared. These are also perfect for an after school snack. Are you ready for the recipe?

Ingredients:
2 1/2 cups of flour
2 cups of brown sugar
1 cup of peanut butter
1/2 cup of vegetable oil
2 eggs
1 1/2 cup of milk
1 tsp vanilla
2 tbsp lemon juice
36 mini Snickers


Directions:
Preheat oven to 350.

Combine flour, brown sugar, and peanut butter. At this point, the mixture may be clumped. It will smooth out once you add the rest of your ingredients.

Add vegetable oil, eggs, vanilla, and lemon juice to the peanut butter mixture. Use your mixer to mix well.

Add 1 cup of the milk, and mix until well combined. Now, add your remaining milk, and again mix well.


In a blender, blend 24 mini Snickers into small pieces. Use a spoon to separate large clumps of blended Snickers that have melted together.

Add the Snickers pieces to the cupcake mixture and combine.

Bake at 350 for 20-25 minutes or until an inserted toothpick comes out clean.


Let your cupcakes cool completely, and top it off with Chocolate Buttercream. Halve the remaining 12 Snickers and place one half in each of the cupcakes icing. This adds a really wonderful accent to the cupcakes.

Hubby took some of these cupcakes to the neighbor across the street. Her exact words were "These look wonderful." Then, a few hours later she stopped Hubby outside and proclaimed, " The cupcakes were really good. I've never had anything like that!"


Well, now you have the recipe. Go out and buy some Snickers and get to baking!
Print this Recipe


This post was featured at:  
Featured on One Creative Weekend


Check out the blogs I'm linking to here!

Print Friendly and PDF

Wednesday, August 15, 2012

Taking Chocolate Chip Cookies to A Whole New Level


Don't you just love Chocolate Chip Cookies? I mean who doesn't? They just so happen to be the best cookies you can eat (well except maybe Turtle Cookies)! But, do you know what's better than cookies? Cake! Or maybe cupcakes. Today, it's cake. Definitely cake. Specifically Chocolate Chip (cookies) Cake.

This cake (how many times am I gonna say cake?) tastes exactly like soft chocolate chip cookies. It is unbelievable!


It's great just as it is, without frosting, but to touch it up a notch, add a bit of chocolate buttercream. Then, top it off with chocolate chips for extra flare.

So, that's about enough of me rubbing this cake in your face. I bet you'd like to know how to make it, huh?

Ingredients:
Print this Recipe
Cake:
4 sticks of butter
3 cups of flour
1 1/4 cup of milk
1 tbsp vanilla
1 2/3 cup of sugar
3/4 cup of brown sugar
4 eggs
1 12oz. bag of chocolate chips
Chocolate Buttercream:
1 lb confectioners sugar
3 1/2 tbsp cocoa
1 pinch of salt
1 tsp vanilla
1/2 cup of solid shortening
2 tbsp butter
milk


Directions:

Preheat your oven to 325. Grease the bottoms of two 8 inch pans heavily. In a medium saucepan, melt your butter. Continue to cook for 25-28 minutes. Set aside to solidify.

Once the butter is solid, cream. By this time, it should be the consistency of smashed bananas and the color in between mango and banana.

In a small bowl, combine milk and vanilla. Add you sugar and brown sugar to the butter. Mix well. Now add your eggs, beating after each addition.

Add one cup of flour followed by 1/2 cup of the milk mixture. Mix well. Repeat this step until you've ended with your last cup of flour.

Fold in your chocolate chips, and bake at 325 for 40-45 minutes or until a toothpick comes out clean.


Now for your icing. This is really simple, and you'll probably think you are doing it wrong. You're not!

Mix together all of your ingredients except the milk. By the time you are finished mixing, this will look very dry. That's okay. Keep going.

Slowly add your milk a little at a time until you achieve spreading consistency. I've never measured this, so I can't tell you exactly how much to use. It's best if you add a little, beat, then add some more.

Spread onto a cooled cake. In this case, after you spread the icing onto your cake, sprinkle chocolate chips onto the top.


I made this cake for my dad's birthday. He loved it! Also, as you can tell from the pictures, I'm not the best at slicing a cake. I get it honestly.

This Chocolate Chip (cookies) Cake is wonderful with the chocolate buttercream. It's also near perfection without frosting at all. I seriously could probably eat it every day.


Chocolate Chip Cookies or Chocolate Chip Cake, either way chocolate chips taste great!


Blogs I'm Linking to:


Skip To My LouOneCreativeMommy.comLil\'Luna The 36th AVENUE

Print Friendly and PDF

Saturday, August 11, 2012

For the Love of Chocolate

Well, Today is my father-n-law's birthday. He loves chocolate more than any man I know. I mean, for father's day, Hubby got him 14 Hershey's Special Dark Chocolate bars. So, for his birthday, I had a surprise in store.


This cake combines chocolate cake with chocolate chips topped with fudge frosting. I've been a bit on a fudge kick lately (see Caramel Filled Cupcakes). This time, however, I made the whole thing.

So, do you want to make a triple chocolate cake for the ultimate chocolate lover in your life?

Here's what you'll need:
Recipe for Fudgy Chocolate Cake
1 12 oz. bag of semi-sweet chocolate chips
1 cup of semi-sweet chocolate chips
2 cups of confectioners sugar
1 tsp vanilla
1 cup of granulated sugar
1/3 cup of milk
5 tbsp butter


Print this Recipe
Preheat your oven to 350.
To make the chocolate-chocolate chip batter, mix up the ingredients just as you would for Fudgy Chocolate Cake. This time, the water in the ingredients is not optional. After your mixture is complete, fold in the 12 oz. bag of chocolate chips until well combined.
Don't forget to grease your pan, and bake at 350 for 25-30 minutes.

I usually bake for 27 minutes, but this all depends on how moist you want your cake.


While the cake is cooling, whip up your frosting.

In a medium sauce pan, bring your granulated sugar, butter, and milk to a boil. Removed from heat, and transfer to a medium bowl.

Add your vanilla and confectioners sugar, whisking 1/2 a cup at a time.

I have this really awesome mixer that came with a whisk attachment. I love it. If you don't have a whisking attachment, that's ok. You can use a regular mixer or paddle attachment.


After your cake has cooled completely, start frosting. If your frosting is not spreading easily, run your spreader under water. This should make it a bit easier.


As an extra chocolate bonus, sprinkle chocolate chips onto the top of the cake.

Slice and share, or don't share, whichever!


  Print Friendly and PDF

Tuesday, August 7, 2012

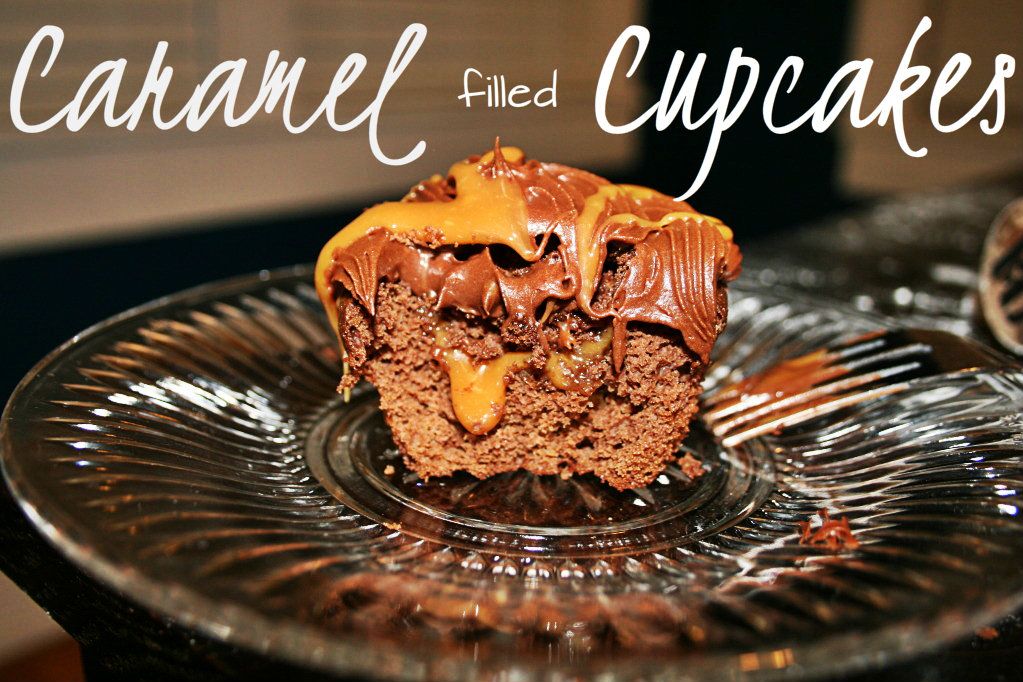
Caramel Filled Cupcakes

I've had about 1/3 of a bag of Kraft Caramel Bits in my pantry ever since I made Turtle Pecan Cluster Cookies. I've also had this great idea for cupcakes since then. I just haven't had the time to make said cupcakes. Well, finally, I was able to. 


Now, I'm a huge fan of caramel. You see, I have loved the stuff since my parents first introduced me to it. Then, at 7 1/2 years old, I was forced to stop eating it. I got braces, and I had them for six years. At almost 14 years old, freedom was finally awarded to me. Instantly, I went for everything I couldn't eat with braces...corn on the cob, pizza without a fork, gum, and the amazing caramel. 

These cupcakes combine the richness of chocolate and carmel, a perfect combination. 

Here's what you need for the cake:
2 cups of flour
3/4 cup of cocoa powder
1 cup of melted butter
2 1/2 cups of brown sugar
4 large eggs
2 tsp vanilla
1 cup of hot water (optional)

Directions: Print this Recipe

In a medium bowl, whisk together the flour and cocoa powder. The whisking keeps you from having to sift. In a separate large bowl, mix in order the brown sugar, butter, eggs, vanilla, and water. Add the dry mix to the wet. Mix well. Bake at 350 for 25-30 minutes, or until an inserted toothpick comes out clean. 


After the cupcakes cool, use a small knife to cut a "cone" out of the center of the cupcake. Make sure you don't cut out too much. 

Now you will need to make the caramel sauce. This is pretty easy. 

You'll need:
1 1/3 cup of Kraft Caramel Bits
1/3 cup of heavy cream

In a small sauce pan, heat the heavy cream and the caramels until the caramel are melted. Make sure you stir with a rubber spatula constantly so the caramel doesn't burn. 


Fill the hole in your cupcakes with the caramel sauce. Be sure not to fill the hole too much, because you will be covering it.


Remember that piece of cake you cut out of your cupcake? Slice the cone part off so that it is now a flat piece of cake. We will call the result the topper. Place the topper onto the caramel to cover it. Now you are ready to frost.

I'll admit, I cheated and used canned fudge frosting. Hey, I made the cake and halfway made the caramel sauce. Plus, I actually like canned frosting. 


Drizzle some of your remaining caramel sauce onto the top of your frosting. This may get messy, so be prepared to do a lot of cleaning. 

I am really happy with the way these turned out. I mean they don't only look amazing, they taste great too!

My favorite dessert is pretty much anything with caramel. What's yours?


This post was featured on:

The 36th AVENUE


Print Friendly and PDF

Saturday, August 4, 2012

Call me, Maybe Cookies


Have you heard the song Call Me Maybe by Carly Rae Jepsen? If you haven't, where have you been? It seems like its all over the place. I mean, just about everyone has done a parody of this song.

I've had this post planned for a while. You see, we just got two new hires in our department at work. If you don't know, I work at a call center. I thought this song would be a great theme for "welcome" cookies.

Wanna make some? Here's what you'll need:

Pink gel coloring
Black gel coloring
Your favorite cookies
#2 and #4 tips
Squeeze bottles
Piping bags
white sprinkles
royal icing

Directions:

You'll need to cut out a few square shaped cookies and a few shaped as the phone of your choice. I used a rotary headset. I printed off a clip-art picture and used a small knife to cut the shape.

While your cookies are cooling, mix up your royal icing, and color. I used a dab of Rose colored icing for the pink , and a bit of black to make the grayish purple.

When your cookies are cooled, begin outlining. Use a number four tip to make sure your outline is thick enough.


Thin your icing until it is the consistency of syrup. Begin to flood. Use a toothpick to smooth the icing into the corners. Be careful not to over-flood.


Let your cookies dry for at least an hour. I usually wait longer than this. A lot of people let them dry overnight. When they are almost completely dry, start piping "Call me maybe". You'll want to add sprinkles to the edge of the squares, as well.  If they are too dry, lightly brush the edges of the cookies with corn syrup so the sprinkles will stick.


I've been on a sprinkle kick lately. I love the look it gives cookies. They aren't necessary, but they do look pretty.


I chose the rotary headset, because it is similar to what we use at work. It also works well with the theme.

These cookies are great for a office themed party. What kind of cookies would be right for your workplace?


Print Friendly and PDF