Sunday, July 29, 2012

DIY: Peanut Butter-Banana Dog Treats


Meet Effie. She is a miniature schnauzer, and she pretty much runs our house. She ran out of treats recently, and that is a no-no in our household. You see, she thinks that she is supposed to get at least one treat a day. She'll sit, lay down, or dance for a treat, but for some odd reason, she thinks she is supposed to get a treat when she comes in from outside. We are currently trying to break that habit.

Any-who, I decided to make treats instead of buying them this time.


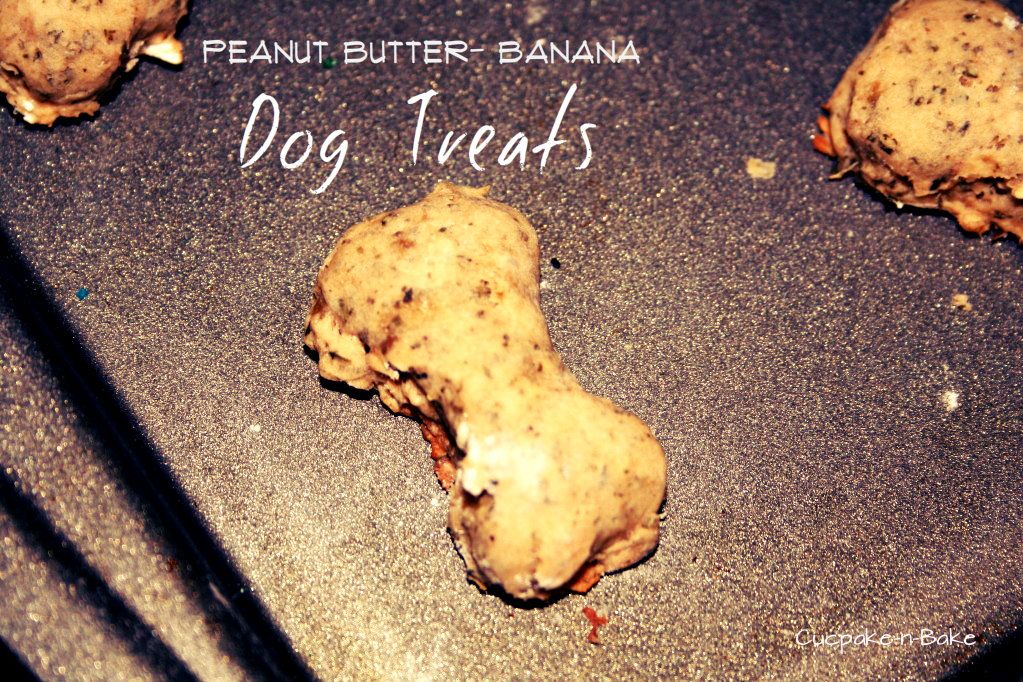
Effie loves peanut butter. We don't normally give her human food, but we occasionally have to use peanut butter to get her to take medication. Wanna make some for your dog?

Print this Recipe
Ingredients:
1 banana
2/3 cup of whole-grain oats
1 cup of flour
1/4 cup of crushed mint (optional for fresh breath)
3 tbsp peanut butter
1 egg

Directions:
Preheat oven to 300. In a medium bowl, beat egg. Add the banana, then mash with a potato masher. Mix in the remaining ingredients with a wooden spoon until well combined.


Roll the dough onto floured wax paper, and sprinkle a bit of flour onto the dough. This will prevent your roller from sticking. If you don't want to make shaped dog treats, you can roll the dough into small balls and flatten to make disks.


Bake biscuits at 300 for 20-25 minutes. You should see them progress in color from darker to lighter.


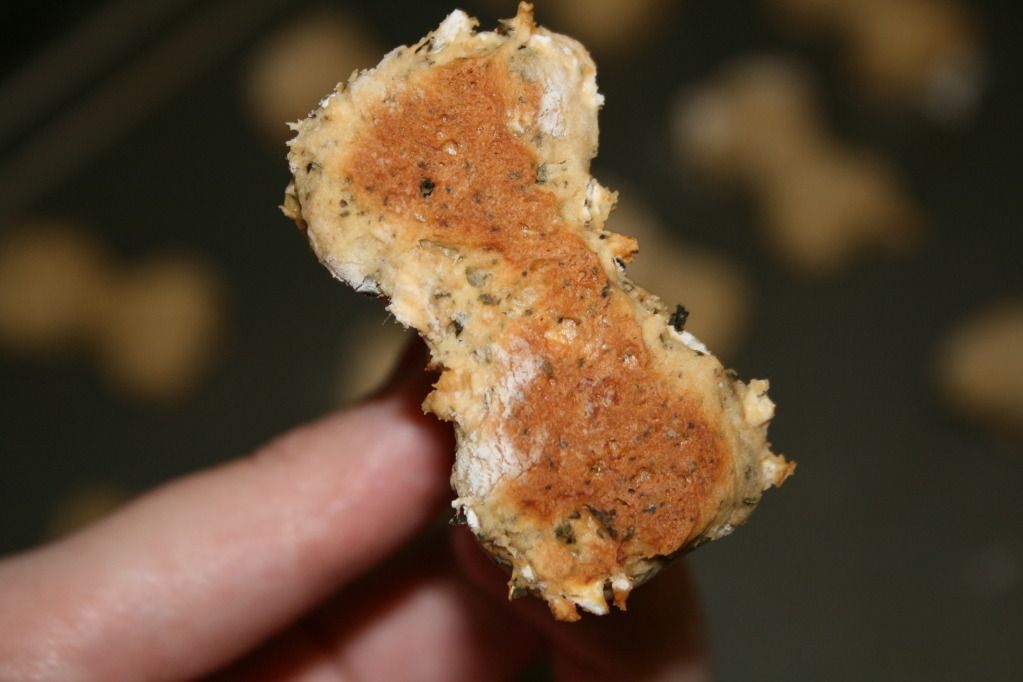
If you want to make sure the treats are done, use a toothpick to lift the treat and check the bottom (as shown above).

Let the treats cool, then give one to your pup to taste-test.


The longer you cook the treats, the crisper they will be. They will always be sort of soft in the middle, though. If your dog has sensitive teeth, I would suggest not cooking them as long. These are actually great for older dogs as well as young ones. I cooked Effie's so they would be crunchy on the outside, but soft on the inside.


Effie loved these, just check out her tongue. After her taste-test, she stood in the kitchen staring at her treat jar for a good 15 minutes.

I'm sure your dog will love these, too. What do you think?

Print Friendly and PDF

Saturday, July 28, 2012

Grandma's Tea Cookies

Remember when I posted the Olympics Cookies, and I promised to post the recipe for the cut-out cookies that I used? Well I'm fulfilling that promise in this post.


Now, I've been baking these for as long as I can remember. This is my Grandma's recipe, but I've always made them with my dad. Baking these were a Christmas tradition every year.

These cookies are very versatile.  They can be decorated, or left plain. The plain ones are perfect for tea parties, and the decorated ones are great for when you want to impress.

Wanna make some?

Print the Recipe
Ingredients:
1/2 cup (1 stick) of butter
1/2 cup of solid shortening
2/3 cup of sugar
1 egg unbeaten
2 1/2 cups of flour
1 tsp vanilla

Directions:

Add all of the ingredients to a large bowl. Knead (with your hands) until ingredients are well mixed.


Yes, you  must knead with your hands. I know its messy, but this will give you the prefect texture. Trust me when I say that you don't want to use a mixer.


Once all the ingredients are well mixed, your bowl should be fairly clean. Next, you'll want to start molding the dough together.


You'll want to start shaping the dough into a ball. I find it best to throw it around like its pizza dough or a softball or something.

You should be able to get your ball of dough pretty smooth.

If you are going to make casual cookies, shape your dough into a log. Using a knife, cut one inch slices into the dough. Bake at 350 until the edges are light brown. This should take around 8 minutes.

If you are making cut-out cookies, lightly dust a sheet of wax paper with flour. Roll out the dough until it is fairly thin.


Freeze the dough about 5 minutes before baking. Before doing that, though, pop a little piece of the dough in your mouth. I promise it will be worth it. Bake at 350 until the edges are light brown. This should take about 10 minutes.

IMG_1772

Be careful not to let them cook too long. These cookies are somewhat sensitive.

Let the cookies cool, then decorate. These taste great with royal icing or buttercream.

Whether you use these simply as a dish for your tea or for a brightly colored birthday party, these cookie are sure to please.

Happy Baking! Print Friendly and PDF

Wednesday, July 25, 2012

Olympics Cookies

The Summer Olympics start Friday, and who doesn't love the olympics? I sure do! So to celebrate, I made Olympics Cookies!


Aren't they cute! They are perfect for an Olympic party, or just for a snack. These cookies don't have too much icing on them, so if you aren't into that, they are great!

Here's what you'll need:
# 2 piping tip (more than one is preferable)
Royal Icing
Cookie Dough
Red, Blue, Yellow, Black, and Green gel coloring
Red, Blue, Yellow, Black, and Green sugar crystals
Small Round Cookie cutter
Small knife
Small round paint brush (available at the craft store)


Directions:

First, you'll need to roll out your dough. The type of dough you are using will determine how thick it should be. I used my Grandma's Tea Cookie Recipe (Post coming later), and they needed to be thin.


Use a small round cookie/biscuit cutter to make the outline of the rings. Do not press too hard, because you want the circles to stay attached. This will simply give you an outline when you start to pipe. Use the knife to outline the edges, so you can transfer the cookie to a baking sheet.

Let your cookies cool completely. Now you are ready for decorating.


Working one color at a time, pipe your outline. Remember, the Olympic Rings interlock, so be sure to leave a space for the next color. This is why it is best to work with one color. Start with the blue, and work your way to the red. Make sure you pipe in this order: Blue, Yellow, Black, Green, Red.


Fill in each ring with the designated color. Because the rings are such a small area, I find it best to pipe the filling in. If you want to flood, that's okay too. Just be careful not to over-flood.


To add the sprinkles, lightly brush corn syrup on each color. Do this one color at a time, and dust the designated color sprinkles onto the rings. Let the cookie sit for a few minutes after each dusting to insure they are dry. By the time you are finished dusting all the cookies, the first one should be dry. Now you can move to the next color.

When you have finished dusting the sugar crystals onto your cookies, gently shake the cookies to get the excess sprinkles off. There will most likely be a few sprinkles that went haywire, but that's okay! It's just a cookie, after all.


There you have it, Olympics Cookies for all your Olympic party needs!


This post was featured at:

Tidy Mom


Print Friendly and PDF

Saturday, July 21, 2012

Going Vegan for Adventure Time

I'm not vegan. As a girl at work said, "I like food too much." I'm here to tell you, though, vegan cake is not bad. It actually tastes kinda good. I'm not saying it's exactly like regular cake, but it's good on its own terms.

So I had to make a vegan cake for a birthday party.


Wanna know how to make it?

Print this Recipe
Ingredients:
2 1/2 cups of soy milk
1 tsp vanilla
1 tsp almond extract
3/4 cup of oil
2 cups of date sugar
3 3/4 cups of self rising flour

Directions:

  1. Preheat oven to 350.
  2. Whisk together all wet ingredients.
  3. Combine dry ingredients in a small-medium bowl.
  4. Pour batter into pans filling halfway.
  5. Bake at 350 until a toothpick comes out clean (about 40-45 minutes).


There you have it, a vegan cake. Trust me it's really tasty!

Oh, I'm not finished yet. This next section will show you how much practice makes perfect. You see, this had to be an Adventure Time cake. Which means, I had to use fondant. Now, don't get me wrong, I have used fondant before. Only once, though. So, I'm using this opportunity to show you that people still love your work, even if it's not the greatest thing ever.


See, not perfect, right. I think the problem was that I didn't have enough fondant. The only way I can think of to prevent those wrinkles in to make the fondant large enough to hang down low enough to cut the wrinkles off. This fondant just wasn't long enough. I will keep trying, though.


Let's talk about the eyes. Now these I am proud of. I got perfect circles by using a PAM top for the black, and a medium sized cookie/biscuit cutter for the white. You know what else is cool? They just stick on the base by themselves. Just to be safe, though, I added a little frosting as glue.


Now for the mouth. This was my favorite part! the little nose is so cute! This basically just takes shaping skills. Just think of it as play dough. A small knife will not only help you get the perfect cut, it will help you get into those tiny corners to push fondant into. I made every piece of this mouth separately, and pushed them into place (minus the tongue). To get the perfect curves when my fingers just wanted to smash, I used the knife. Invest in a small knife, trust me.

Fondant can be easy to work with, and hard to work with. It just takes practice.


All good things come from hard work.

Print Friendly and PDF

Monday, July 16, 2012

Fresh Squeezed Lemonade


 Easy and Different Fresh Squeezed Lemonade via @cupcake_n_bake. Must Try! #summer #lemonade

I don't know if it has been hot where you are, but it has been H-O-T in Alabama. Even with the rain, it's been scorching. 

You know what's good for hot? Lemonade. 

This lemonade is a little different, though. 

Here's what you'll need:

- 6-8 lemons
- water
- sugar

 How to make fresh squeezed lemonade by @cupcake_n_bake #summer

I work two lemons at a time. You'll need to cut them in half.

 How to make fresh squeezed lemonade via @cupcake_n_bake #summer

Next you will need to juice them. I don't have a fancy juicer, because well I don't juice that much. Mine is semi-automatic though.

 How to make fresh squeezed lemonade via @cupcake_n_bake #summer

Like I said, work two lemons at a time. Add 1.25 cups of water in after each couple of lemons. Keep juicing and adding water until you've filled up your pitcher. 


Now, this is where it gets different. This lemonade does not have sugar in it. It has sugar around the rim of the glass. Yes, it's exactly like a margarita! 

 How to make fresh squeezed lemonade via @cupcake_n_bake #summer

Moisten the rim of the glass with a wet paper now, and pour a bit of sugar onto a piece of wax paper. Now, rub the rim of the glass into the sugar. If you want to get a really good sugar base, pick the sides of the wax paper up to get the sugar to stick further down the glass. 

Fresh Squeezed Lemonade via @cupcake_n_bake. Must try! #summer #lemonade

There you have it, fresh squeezed lemonade for your hot summer days.


Print Friendly and PDF

Saturday, July 14, 2012

Can You Freeze Cake? Sure You Can!

Have you ever had to make a cake, or cakes, and just did not have the time to wait to the last minute? Well me too!

I have a birthday and a wedding this weekend, not to mention a full time job. Oh, and I don't get off work until 8pm! Obviously, I can't wait until later this week to get started. So, I went ahead and cooked the birthday cake today.


Freezing a cake easy, and it keeps the freshness. You'll want to cool the cake, and level it. That way, you won't have to do that later.


First, wrap your cake in aluminum foil. You can double wrap it or single wrap it. You want to make sure that is is wrapped completely.


Next, you wrap it in plastic wrap. If you double wrapped the aluminum foil, you can skip this step. Now you can pop it in the fridge.

When you get ready to use the cake, just remove it from the fridge and unwrap it. Thaw on a cooling rack completely. You can now frost. Easy Peasy.


Did I mention I got a new camera? Print Friendly and PDF

Monday, July 9, 2012

Giant Cupcake Smash Cake

So, I've been putting this one off, because I really don't have much to say about it. However, I feel the need to share.

I made this giant cupcake for a little girl's 1st Birthday. This was her "smash" cake. The thing is, babies aren't really that hard to please. Just shove some icing in their face, and they will go for it. If you're lucky, they will actually eat the cake too.


This cake was Minnie Mouse themed, as you can see. I've done Minnie Mouse before, so that was no problem. The problem was trying to decide how I was going to do the bottom of the cupcake.

You know, the part that usually has a liner on it.

Yeah, that was a challenge. So I started Googling. Google is my best friend.

I found a few pictures of a chocolate shell. This is a great idea!


Here's what you do:


  • Melt a bag of dark chocolate candy melts (or any color you want).
  • Pour half the melted candies into your cupcake pan.
  • Use a rubber spatula to spread the candies up the sides of the pan. You need an even spread.
  • Place the pan in the refrigerator for 15-20 minutes until hard.
  • Pour the rest of the candies into the pan. Smooth with the spatula again.
  • Cool the pan again until hard. This shouldn't take as long as it did the first time.
  • Flip pan onto wax paper. The shell should release.
Remember: Make sure the top and sides are thick, or it will not release from the pan.

Don't worry if it doesn't come out correctly the first time. I had to try it twice.


When you bake the cake, it will be slightly too large for the shell. Simply place the bottom half of the cake into the shell, then slice the extra off. Now you are ready to place the top half and frost.


Chocolate Candy shells are perfect for the giant cupcake. It's super easy too.

Good Luck!

Print Friendly and PDF

Thursday, July 5, 2012

Peaches + Cream Cupakes


This week, I decided to make Peach Cupcakes. These were intended for our Independence Day festivities. I'm not a big fan of peaches, but my hubby loves them.


The best peaches to buy are from your local Farmer's Market or Flea Market. We, however, got some pretty great ones at the local grocery store.

These were very soft. I sliced up six peaches, then peeled the skin off of them. My hubby prefers to eat the skin, but he informed me (a non-peach eater) that a lot of people don't like the skins, hence the peeling.


I then put the slices of peach in the food processor, and pureed them up.


I usually use a boxed cake mix; because, well, they are easier and taste just as good, in my opinion. White cake is perfect for alterations or additions.


Just mix the cake exactly as the box says, then add you peach puree. While the cupcakes are cooling, mix up your frosting. I used a whipped cream frosting with cream cheese as the base.

The middle will sink a little, but I sort of like that. This gave me the option to ice a little or a lot. It also allowed for a kind of surprise center. Trust me, cupcake eater like surprises.


Chill these in the refrigerator; and Viola, Peaches and Cream Cupcakes. Enjoy!
Print this Recipe Print Friendly and PDF